
Cache Associativity - Algorithmica
CPU cache会十分影响程序的实际性能表现。我们一般将cache问题给归结为以下三点:
- cache line(缓存行)的影响。
- cache association。 缓存关联
- False cache line Sharing。错误缓存行共享。
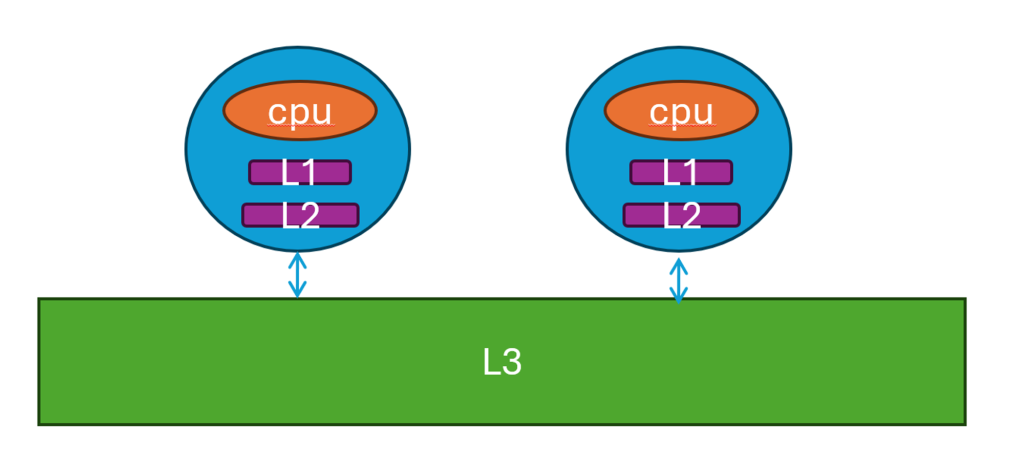
参考Storage – CS 61 2022 (harvard.edu)网站可以看到,不同级别的缓存速度差异天差地别。越靠近cpu的缓存速度越快。访问L1 缓存需要1.1 ns, 访问L2 缓存需要 3.3 ns, 访问L3 缓存需要 12.8 ns。
需要讲几个前提知识:
- 在现代多核心cpu中,一般L1和L2 cache是核独占,L3是不同核之间共享。
- 如果cpu需要的数据cache没有存在,那么需要从主存将数据调往cache中。在调取数据时,是一个cache line的数据一起调取,而不是只取你想要的数据或者你要的那个byte。一般而言,一个cache line的数据是64 bytes。
- 举个例子,假设主存总共放了128 个bytes的数据,比如你想要读取一个byte,这个byte的位置在主存中是第10个byte。 你去取这个byte,会把 0-63的数据全部读取到cache中,因为0-63的数据是对应一个cache line。
- 如果我们用上了N-associative cache,(这里都不懂没关系,后面会讲),一个cache line从主存读取到cache后,会占cache N个slots,也就是每个cache line 冗余相同的N个,这样可以防止缓存过早消失,缺点是带来这冗余数据的开销。
- 当某个cache line的slots都用完了,那么就需要
cache replacement policies(缓存文件置换机制 - 维基百科,自由的百科全书 (wikipedia.org))来移除某一些占用的slots,比如经常用LRU(146. LRU 缓存 - 力扣(LeetCode))来移除slots。
我用的机子是Intel Xeon 8358(Intel® Xeon® Platinum 8358 Processor)。
使用linux命令 getconf -a | grep CACHE 查看机子的cache:
LEVEL1_ICACHE_SIZE                 32768
LEVEL1_ICACHE_ASSOC                8
LEVEL1_ICACHE_LINESIZE             64
LEVEL1_DCACHE_SIZE                 49152
LEVEL1_DCACHE_ASSOC                12
LEVEL1_DCACHE_LINESIZE             64
LEVEL2_CACHE_SIZE                  1310720
LEVEL2_CACHE_ASSOC                 20
LEVEL2_CACHE_LINESIZE              64
LEVEL3_CACHE_SIZE                  50331648
LEVEL3_CACHE_ASSOC                 12
LEVEL3_CACHE_LINESIZE              64
LEVEL4_CACHE_SIZE                  0
LEVEL4_CACHE_ASSOC                 0
LEVEL4_CACHE_LINESIZE              0
我们看到,缓存使用cache line size = 64B。 L1 指令cache(instruction cache) 大小是 32768 / 1024 = 32KB。数据cache 49152 / 1024 = 48KB。
cache line的影响
#include <iostream>
#include <chrono>
int main(int argc, char* argv[]) {

    const int length = 512 * 1024 * 1024;
  // cache line size = 64, type int has 4 bytes, 32bit. 64 / 4 = 16
    const int cache_line_size = 16;
    const int m = length/cache_line_size;

    int *arr = new int[length];

    // contiguous access
    auto start = std::chrono::high_resolution_clock::now();
    for (int i = 0; i < m ; i++)
        arr[i]++;
    auto stop = std::chrono::high_resolution_clock::now();

    auto duration =
    std::chrono::duration_cast<std::chrono::milliseconds>(stop - start);

    std::cout << (float) duration.count() << std::endl;

    free(arr);
    return 0;
}
这个实验测试结果是 209 ms。
当我们增大测试数据,比如读取16倍的数据。同时设置循环的step是16,那么实际上,
m * 16 / 16 = m,实际仍然会访问cache line m 次。
for (int i = 0; i < m * cache_line_size; i+=cache_line_size)
        arr[i]++;
实验结果耗时2732ms。耗时13倍。
这结果显示,我们虽然都是访问了m次cache line,但是第二次实验结果明显慢于第一次。
其实,在第一次实验结果中,我们会发现step=i++,当读取index=0时,cache line会同时从内存读取0-15的数据放到缓存中。第二次实验,每次都需要从内存中读取新的cache line。
这个实验结果告诉我们,尽量使用临近的数据(cache line),避免每次重新从内存抓取数据。
False Cache Line Sharing影响
void update(int *inp, int j) {
    for (int i = 0; i < 1000000; i++) inp[j]++;
}

int test2() {

    const int length = 1024;
    int *arr = new int[length];

    long long b = 1000;
    float a = 0.0;

    // updates happen in different cache lines
    for (int r = 0; r < b; r++) {
        auto start = std::chrono::high_resolution_clock::now();

        std::thread thread1(update, arr, 0);
        std::thread thread2(update, arr, 1);
        std::thread thread3(update, arr, 2);
        std::thread thread4(update, arr, 3);

        thread1.join();
        thread2.join();
        thread3.join();
        thread4.join();

        auto stop = std::chrono::high_resolution_clock::now();

        auto duration =
        std::chrono::duration_cast<std::chrono::milliseconds>
                    (stop - start);

        a += (float) duration.count();
    }

    std::cout << float(a)/float(b) << std::endl << std::endl;

}
代码中,我们设置有4个线程,每个线程分别修改第0,1,2,3处的数据。这样可以让每个核invalidated 他们cache中的cache line。整个程序耗时:26s。
当我们修改每个线程所对应的cache line后,让每个线程独占某个cache line:
std::thread thread1(update, arr, 0);
std::thread thread2(update, arr, 16);
std::thread thread3(update, arr, 32);
std::thread thread4(update, arr, 48);
程序耗时 9s。速度提升很多。
这实验结果告诉我们:不同核之间同步cache需要时间。
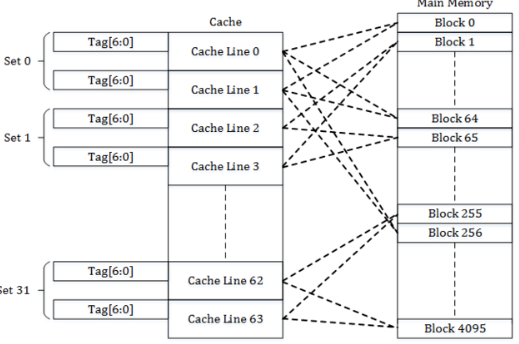
Cache Associativity的影响
一些cache associativity的前置知识:
参考至维基百科:Cache placement policies - Wikipedia
cache-types (berkeley.edu) 图片引用自这里。
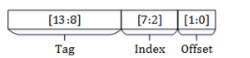
数据放到cache的哪个位置,是有一套计算方式的,一般而言,就是上图中所示,分为:
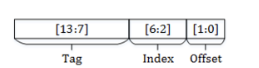
tag + index + offset 3个部分。把地址从低位到高位依次划分:
offset,就是cache line能存放多少个byte。一般而言放64个byte,那么offset就需要 2^6 6个bit来表示。
index,表示set的数量。就是cache中有多少个冗余的cache line。我们的机子上3级缓存是12个, 2^4 4个bit就能表示index。
tag,实际上是实际内存地址的其他剩余bit。
比如:
在维基百科中的例子,主存有16KB, cache有256B,一个cache line是4B。
16KB需要14个bit来表示地址。cache line是4B,需要2个bit来表示offset的地址。tag和set的地址计算看下面的三种模式:
Direct-mapped cache
这种方式下,每个set一个cache line。
例子中,cache 是256B, cache line 是4B,这种方式下,总共能有 256/4=64个set。
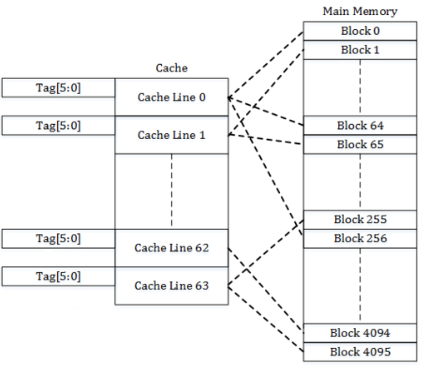
index → 决定使用哪个set。64个set需要使用6个bit来表示。
tag → 14 -(6 + 2)= 6 bits。
实际计算例子:
内存地址0x0000 (tag - 0b00_0000, index – 0b00_0000, offset – 0b00)。放set 0。
内存地址 0x0004 (tag - 0b00_0000, index – 0b00_0001, offset – 0b00) 。放set 1。
内存地址 0x00FF (tag – 0b00_0000, index – 0b11_1111, offset – 0b11) 。放set 63。
内存地址 0x0100 (tag – 0b00_0001, index – 0b00_0000, offset – 0b00) 。放set 0。
这种方式的问题就是,每个cache line单独对应一个实际的内存物理地址。这个cacheline容易被下一个新的内存地址替换,替换后就需要重新从内存加载。
Fully associative cache
与Direct-mapped cache相反,一个set放所有的cache line。也就是不划分set。
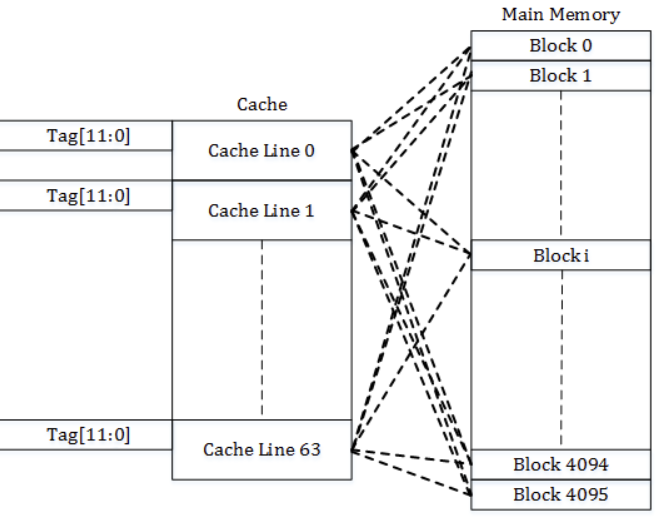
tag → 14 - 2 = 12 bit 表示tag。
每个内存地址都可以放到当前的set里。
代价就比较昂贵,set可以存放冗余的当前内存地址。很浪费cache空间,开销很大。
Set associative cache
假设我们想要cache中放2份相同的冗余cache line,那么set数量等于2。这种方式叫做 2-way set-associative。
例子:
主存大小16KB。cache line 4B。 16KB/(4 * 2)=32。 cache可以划分为32个set。
offset → 32 需要5个bits表示。
tag → 14 - (5 + 2) = 7 bits 表示。
是fully 和 direct associative 的一种折中。实际应用中就i是这种类似的设置多少冗余cacheline的方式,这就是现实生活中的balance的体现吧(中庸之道)。
测试
上面测试cache大小中,显示我们的3级缓存 LEVEL3_CACHE_SIZE 50331648 是 50331648/(1024*1024)=48MB。
3级缓存使用的associative set = 12。3级缓存能放置50331648/64=786432个cache line。
可以分成 786432/12=65536个不同的set。
65536 * (64/4)= 1048576 个数据会占满能放当前数据的所有set。
void test6() {
  const int length = 512 * 1024 * 1024;
  const int m = 1048576;
  int *arr = new int[length];

  auto start = std::chrono::high_resolution_clock::now();
  for (int r = 0; r < 10000; r++) {
    for (int i = 0; i < length; i += m)
      arr[i]++;
  }
  auto stop = std::chrono::high_resolution_clock::now();

  auto duration =
      std::chrono::duration_cast<std::chrono::milliseconds>(stop - start);

  std::cout << (float)duration.count() << std::endl << std::endl;

  free(arr);
}
当for loop step = 1028576时,耗时 150ms。
const int m = 1048576 - 100;
当我们把m - 100时,耗时34ms。
所以当占满能存放当前数据的set时,会需要从cache删除数据重新存放。触发从主存中重新读取数据。
另外一个asscociative带来的问题是step是2的整数倍时,这样会导致计算set的地址是相同的,相当于重复往某个相同的set放数据,也会导致来回替换cache line。比如当m = 16384时:
const int m = 16384;
耗时8000ms。
当m设置成不是2的整数倍时:
const int m = 16385;
耗时5000ms。
所以,避免使用2的整数倍的很大的step,这样相当于缓存来回放到某个set里。
参考
Comments NOTHING